Generating Extent Reports – Java – Version3
Extent reports are very rich HTML reports for the selenium webdriver. This report will give so much of information about the execution status. The extra information can be provided using some of the methods provided by the extent reports classes.
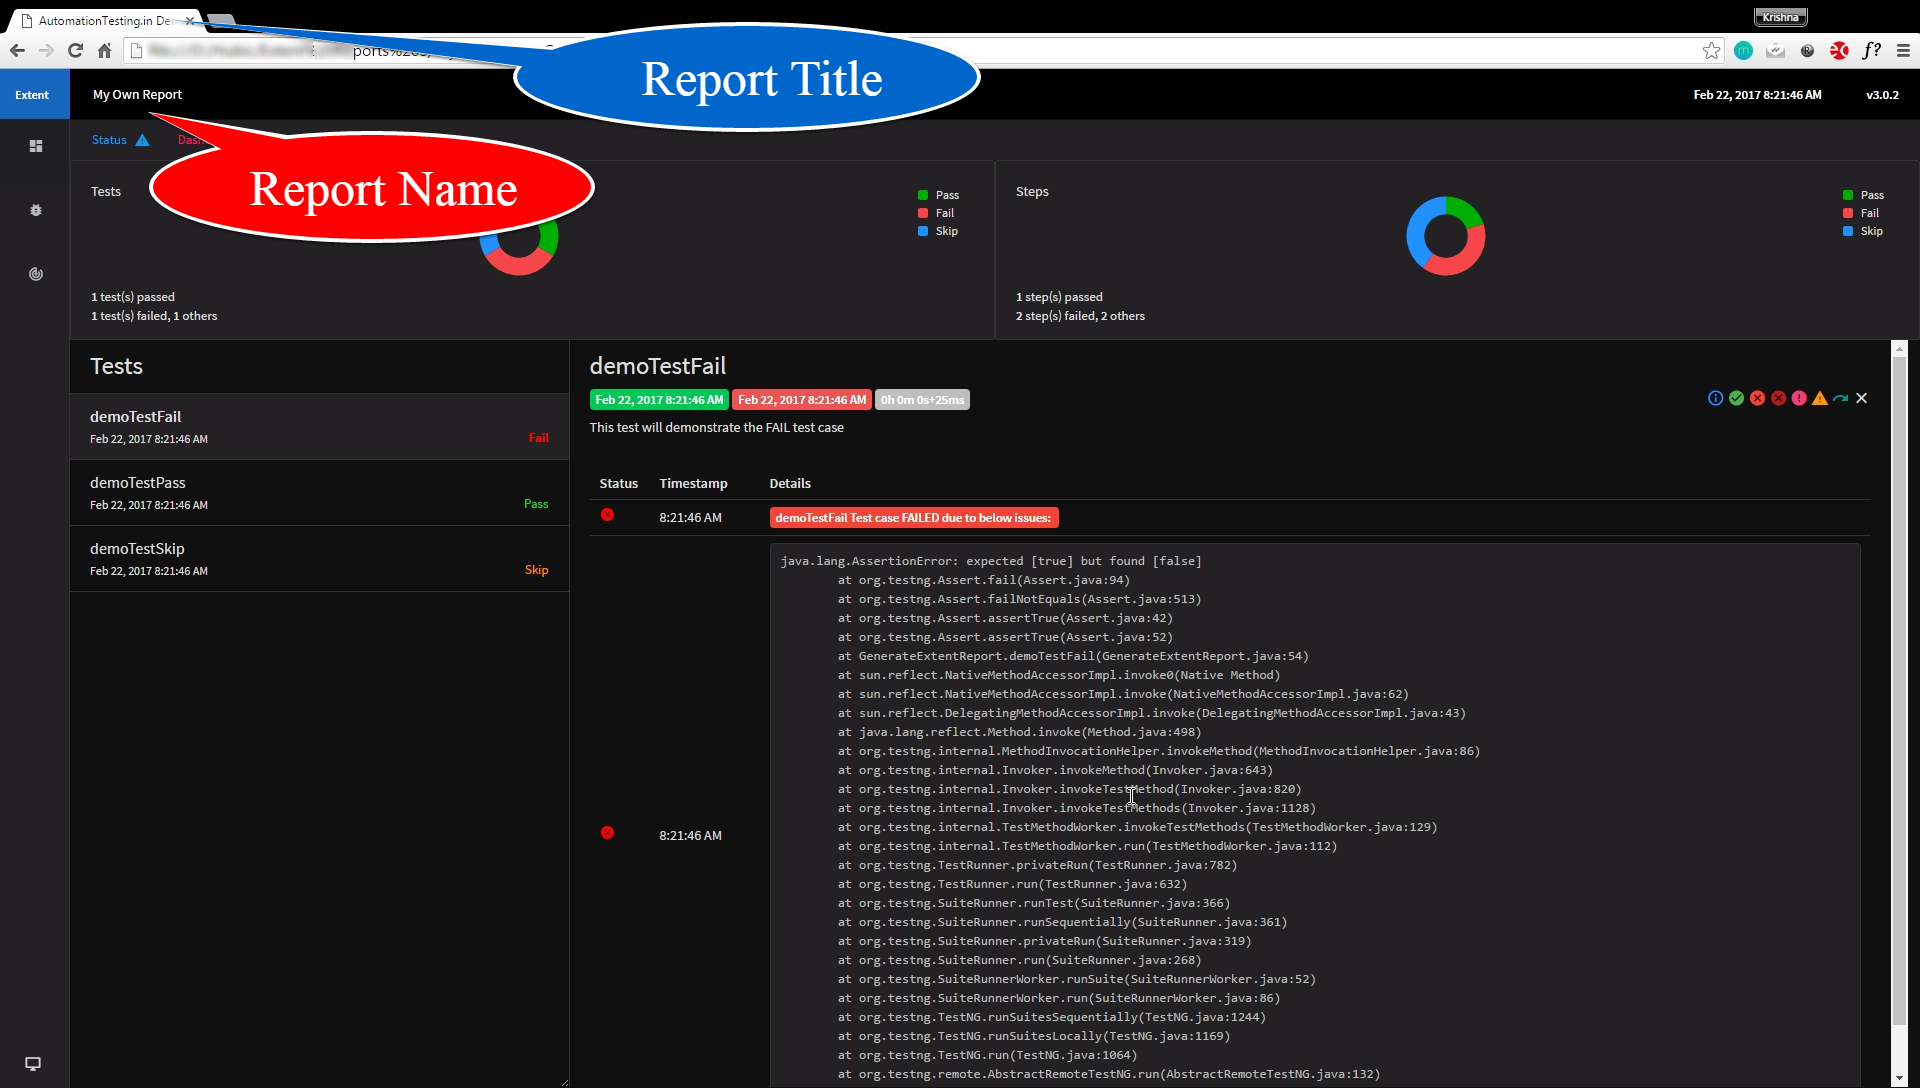
We can provide below information to be displayed in the HTML report:
- Report Title
- Report Name
- PIE Chart Visibility
- PIE Chart Location
- Document Theme
- Operating System Name
- Hostname
- Environment Name
- User Name etc…
Below is the sample program:
[java highlight=”20-22,27-29,31-34,36-40,46,53,60,69,70,74,78,79,86″]
import org.testng.Assert;
import org.testng.ITestResult;
import org.testng.SkipException;
import org.testng.annotations.AfterMethod;
import org.testng.annotations.AfterTest;
import org.testng.annotations.BeforeTest;
import org.testng.annotations.Test;
import com.aventstack.extentreports.ExtentReports;
import com.aventstack.extentreports.ExtentTest;
import com.aventstack.extentreports.Status;
import com.aventstack.extentreports.markuputils.ExtentColor;
import com.aventstack.extentreports.markuputils.MarkupHelper;
import com.aventstack.extentreports.reporter.ExtentHtmlReporter;
import com.aventstack.extentreports.reporter.configuration.ChartLocation;
import com.aventstack.extentreports.reporter.configuration.Theme;
public class GenerateExtentReport
{
ExtentHtmlReporter htmlReporter;
ExtentReports extent;
ExtentTest test;
@BeforeTest
public void startReport()
{
htmlReporter = new ExtentHtmlReporter(System.getProperty("user.dir") +"/test-output/MyOwnReport.html");
extent = new ExtentReports();
extent.attachReporter(htmlReporter);
extent.setSystemInfo("OS", "Mac Sierra");
extent.setSystemInfo("Host Name", "Krishna");
extent.setSystemInfo("Environment", "QA");
extent.setSystemInfo("User Name", "Krishna Sakinala");
htmlReporter.config().setChartVisibilityOnOpen(true);
htmlReporter.config().setDocumentTitle("AutomationTesting.in Demo Report");
htmlReporter.config().setReportName("My Own Report");
htmlReporter.config().setTestViewChartLocation(ChartLocation.TOP);
htmlReporter.config().setTheme(Theme.DARK);
}
@Test
public void demoTestPass()
{
test = extent.createTest("demoTestPass", "This test will demonstrate the PASS test case");
Assert.assertTrue(true);
}
@Test
public void demoTestFail()
{
test = extent.createTest("demoTestFail", "This test will demonstrate the FAIL test case");
Assert.assertTrue(false);
}
@Test
public void demoTestSkip()
{
test = extent.createTest("demoTestSkip", "This test will demonstrate the SKIP test case");
throw new SkipException("This test case not ready for execution");
}
@AfterMethod
public void getResult(ITestResult result)
{
if(result.getStatus() == ITestResult.FAILURE)
{
test.log(Status.FAIL, MarkupHelper.createLabel(result.getName()+" Test case FAILED due to below issues:", ExtentColor.RED));
test.fail(result.getThrowable());
}
else if(result.getStatus() == ITestResult.SUCCESS)
{
test.log(Status.PASS, MarkupHelper.createLabel(result.getName()+" Test Case PASSED", ExtentColor.GREEN));
}
else
{
test.log(Status.SKIP, MarkupHelper.createLabel(result.getName()+" Test Case SKIPPED", ExtentColor.ORANGE));
test.skip(result.getThrowable());
}
}
@AfterTest
public void tearDown()
{
extent.flush();
}
}
[/java]
In the above program, we have used three classes called ExtentHtmlReporter, ExtentReports and ExtentTest. These three classes will help us to create a rich HTML reports with lot of useful information. ExtentHtmlReporter will take the HTML report file path as an argument and it will create the report file with the mentioned name in the mentioned location. By using this we can set lot of configuration to the report. ExtentReports will be used to set the system/custom information in the generated HTML report. And ExtentTest will be used to log the so much information to the report like PASS, FAIL and SKIP status of the executed tests. Along with this we can generate logs in the generated HTML report.
Important points to be remember:
- ExtentHtmlReporter will create the report file and set the configuration to the report.
- ExtentReports will set the system/custom information to the report.
- ExtentTest will log the information in the report.
- createTest() method of ExtentReports class is the starting point of the test and it will return the ExtentTest object.
- We need to capture that object into ExtentTest object.
- Used this reference to log the information into the report.
- ExtentHtmlReporter object will be used to add the report information like Title, Header and Theme etc..
- flush() method of ExtentReports will push/write everything to the document.
Output of the above program is:

Please watch the YouTube video of this blog for better understanding.


